Archive | Bike RSS feed for this section

Giro Advantage 2 Aero Helmet Sale

Here’s an awesome find for our deals section.

I’ve seen this Giro helmet on sale before but not at this price! It might be a typo so go get one right away. Get one of the best-selling aero helmets in history. It looks like the Advantage 2 is on sale only for a limited time so go grab one before they are all gone. This is a great helmet for triathlon, time trials, or Halloween parties.

If you’ve been waiting for the cheapest price, big deal, special price, or coupon wait no longer. Google it you’ll see the price is the lowest around. I’m pretty sure this won’t last.

Here’s what the site says about the helmet:
“… The Giro Advantage 2 Time Trial TT Aero Bike Helmet is shaped with input from the worlds fastest riders over 23 years. The choice of elite professionals like Alberto Contador, Levi Leipheimer, David Millar and Alejandro Velverde. The Advantage 2 represents the pinnacle of aerodynamic performance, fit and ventilation. Simply put, it’s what the world’s best riders wear when every thousandth of a second counts…”

Giro Advantage 2 on sale, there’s also a video review of the product on the site. I’ve embedded it here:

Beginner Triathlon Transition Tips

Triathlon Transition Area

Your fingers scrape against dense sand, a startling and unfamiliar texture, after having swum across a bottomless and vast expanse for what seemed an eternity. As you near the end of your first triathlon swim course the roar of a crowd cheering penetrates the sloshing water and the guff of your hardened rhythmic breathing and your adrenaline spikes. The next few seconds become an overwhelming blur as your body wills itself through sand, sound and silhouettes towards the transition area, all the while your mind focusing on one question. What happens next?

The transition area is at best controlled chaos. You’re in race limbo, trapped within a fixed space where you must prepare yourself for the next stage of your journey, and all the while the omnipresent race clock continues to tick. Upon entering this area, triathletes, no matter their age, sex or elite status are immediately sorted into one of two categories. Prepared and unprepared.

This is a guide for beginner triathletes who want to better prepare themselves for triathlon transitions.

Swim to Bike – Transition One (T1)

Before you arrive to the course you should be practicing taking off your wetsuit. Don’t be that person searching for the pull zip while running through the transition chute. Instead take the time before your race to practice running while finding your wetsuit zipper and stripping it down to your hips. Run, don’t walk, out of the water while immediately taking off your cap and goggles.  When you do pull your arms through your suit pull your cap and goggles through too, lodging them into the arm of the wetsuit. This helps to keep the clutter of your own transition area to a minimum and will ensure that you don’t forget them when you’re packing up after your race.

Practice taking your wetsuit off beforehand!

Before your race you should have already mastered the art of taking off a wetsuit as to avoid the time-costly and comical transition wetsuit wiggle. And honestly it just takes a few tries to get it down pat.

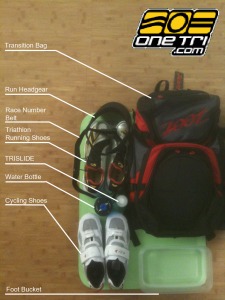
How to arrange your transition area:

Transition Area Setup

Transition Mat Setup

  • Choose a spot as close to the bike exit as possible
  • Set bike equipment in front of your run equipment so that it is quickly accessible.
  • If your swim exit took you through sand you may want to have a tiny bucket or water bottle available to quickly rinse your feet of sand and pebbles
  • Never eat or drink while in transition. Attach all nutrition to your bike (taping it to the tube or inside a bento box). There will be plenty of opportunities to eat and drink while cycling!
  • Put your bike helmet on first! You should mount your helmet between your aerobars or on your handlebars making it easily accessible and immediately visible. You must have your helmet on and clipped before having any interaction with your bike otherwise you will suffer a penalty.
  • Run your bike to the mount line and mount your bike in one of 3 ways.
  1. Running bike mount – This is the fastest and most difficult mounting technique. With your shoes already clipped into the bike’s pedals, the triathlete runs alongside the bike and jumps onto the saddle while taking a few pedal strokes to gain speed and stability before slipping his/her feet into their shoes. 
  2. Push-start mount – Somewhat fast. With your shoes once again already clipped into the pedals, stand next to the bike with one foot on the pedal pushing off with the other foot before pedaling away and slipping your feet into your shoes.
  3. Over the bike standing mount – This is the slowest and most common form of mounting your bike. Chances are this is how you start off every training ride and is the way that most of us have gone about mounting our bike since our first ride. There’s nothing wrong with this technique, you’re just losing time putting on your shoes and beginning from a static state instead of doing all of this while gaining momentum and distance using either of the above techniques.

Bike to Run – Transition 2 (T2)

Some Triathlons will mark exits in chalk

When approaching the end of the bike course, shift to a higher gear and spin at a higher cadence to help prepare your legs for the run. Remember to keep your helmet on and clipped at all times until your bike is completely racked to avoid a penalty! After racking your bike, unclip your helmet and put on your triathlon running shoes and race belt before grabbing any extra gels or equipment. When making your way to the run exit, put on any extra run gear instead of staying static at your transition-mat. Finally, shorten your stride until your legs loosen up from biking. It may take a mile or so but don’t worry, you’ll find that running groove in no time!

I hoped to answer some of the following questions in this post. Let me know if I missed something.
– What do I need for my transition area?
– How to set-up a transition area?
– What is a transition area?
– What is the best way to set-up my transition area?
– How do I set-up my transition area?

Louis Garneau Tri-Lite Bike Shoes

Louis Garneau Tri Lite Bike Shoe

The Louis Garneau Tri-Lite Cycling Shoe

Louis Garneau makes several different triathlon cycling shoes, including the tri lite, which is a mid to higher end shoe.

I updated to the Louis Garneau Tri-Lite last year from a generic regular bike shoe I bought at a big chain store when I first got started in cycling a few years before.   After a bit of installation to line up the cleats as I had them, I went on the bike for a ride and immediately felt the difference.  This was the first thing I bought with carbon for biking.

By far, one of my favorite features on this shoe is the carbon composite sole.  Because it’s stiffer than the last shoe, the power transfer is significantly more efficient, and my feet are much more comfortable when riding.  These shoes feel much cooler, as Louis Garneau’s Tri-Lites have vented soles to help your feet dry from the swim.

The shoe weighs 226 grams.

Picture of the tri-lite.  Notice how it has one main reversed strap on the upper.

The carbon sole with vent.

Also a great plus about these shoes is the interchangeable sole insert.  Red for colder days, and blue for the warmer ones.

I’ve worn these without socks for sometime now, and I rarely wear my other cycling shoes, which I’ve relegated to spin class.

Check out the tri-lite and other tri shoes at OneTri.com.

Profile Design Aerodrink Base Bar

Profile Design Aerodrink Base Bar. Simple and basic, this new bracket by Profile Design is probably one of my favorite new products.

  With this new bracket, your aero drink mounts directly onto your base bar, freeing up space from your cockpit and brings it closer to your body.  For a lot of people, it makes it easier to drink from this new position.  This bracket is also a lot more secure, and reduces any excessive rattling, as it allows the bottle to “click-in” place.

The bracket is for use with Profile Design aero drink bottles.  To see more Profile Design products, check out their brand page.

Xlab Rocket Pocket

This is the Xlab Rocket Pocket (like a bento box).  It’s small and contoured so that it wouldn’t slip or slide down or around the top tube while resting.  It holds all the essentials like your keys, gels, bars, and IDs.

The Xlab Rocket Pocket is good for use during training and during race day so that you’ll have access to what you need on the bike.

Don’t want to put nutrition in it?  You can also just use it to put tools in there if you prefer.  The sky is the limit.  See this and more Xlab products by going to the Xlab products page.

Bellwether Retro Jersey

I’ll probably get a lot of crap for this, but triathlon and cycling apparel has gotten so serious and technical that all the style is non-existent these days.  So this is why I’m a proponent of the Bellwether Retro Jersey.  Comfortable and stylish, it features an elastic-free arm opening, silicon elastic gripper at the hem, three slanted pockets, and a 4″ zippered pocket.   Pair this  with a Bellwether Forma Bib Short  (I found these to essentially double as a compression piece for active use), and you’re set for the road.

Fit:  Club Fit (means that the fit is a bit more relaxed, as if you’re riding with a club, get it?)
Fabric: Quadra-Tech (excellent ventilation system for moisture and heat management)

Bellwether Comfort Control System (Below info is from Bellwether)

Clothing physiology is the interaction between the layers of clothing and the body’s own micro climate. Air temperature, humidity, skin temperature, rate of perspiration, and other factors all effect clothing performance. Technical fabrics and products only work well if they allow the body to achieve equilibrium between the input and output of heat and moisture.  With the Bellwether Comfort Control System, the correct balance of breathability and moisture transfer is achieved. The properties of each fabric are chosen to support the thermoregulation of the human body to insure maximum performance and optimal comfort.  At Bellwether we understand the functional design of our products. Using our Comfort Control System as a guide, we can ensure that each item is designed to excel for its intended purpose.

Quadra Tech

Unique box like construction increases the outer surface area of the fabric which improves transfer of perspiration away from the skin for speedy evaporation, while small channels promote ventilation for proper temperature modulation.

Xlab Gorilla XT – Highest Grip Carbon Cage

The Xlab Gorilla XT.  If you’re riding on bumpier roads, or you’re paranoid of any bottles flying out your rear hydration systems, this is the cage for you!  Designed for mountain bikers, this is Xlab’s highest grip carbon cage.


Light, sturdy, tight, and tough, your bottles ain’t going anywhere anymore – meaning you can rest assured while going on the trails.  Gone are the days of having to deal with one less bottle on the road or trail.  The Gorilla XT cage installs quickly like any other cage.  So go ahead, jump over that mountain lion, or that neighborhood cat and don’t even think twice about it.

See this and more Xlab products on the Xlab products brand page.

Profile Design T2+ Aerobar Extensions

The Profile Design T2+ Aerobar Extensions uses a system that fits both 26.0mm & 31.8mm bars, making the Profile Design T2+ Aerobar Extensions one of the most practical S-Bend extension on the market! These aero bars are ideal for triathletes and time trialists.  These are an excellent replacement if you’re looking a flatter bar that puts you into a more aggressive riding position.

Installation for these bars aren’t the most difficult, but you should have some basic understanding of cable routing for your shifters if you decide to go that route. You can also have your local bike shop help you out.

FEATURES:

  • Affordable, lightweight aluminum constriction
  • MULTI-FIT System™ fits 26.0mm & 31.8mm bars
  • 6061-T6 aluminum extensions and forged brackets
  • Length, width, and rotational extension adjustment
  • Equipped with “J” Brackets™ for a lower arm position
  • Includes F-19™ length and rotationally adjustable armrests
  • Shot peened and anodized finish for added strength and durability
  • Dual cable routing holes for optional internal cable routing Full aero carbon wing with ergonomic brake grip areas

SPECIFICATIONS:

  • Clamp: 26.0mm & 31.8mm bars
  • Width: Adjustable
  • Color: Anodized matte black
  • Weight: 470g

Bellweather Forma Bike Short Review

Recently while on my stationary trainer, I got the chance to wear the Bellweather Forma Bike Short.  Boy was I excited. This short comes with some noteworthy features worth taking a look at. As previously noted in another blog, I discussed the differences between tri shorts and bike shorts. The Forma falls into the bike short category, bringing with it a thicker chamois, longer inseam, and different material. The chamois and material are what drew me in. The material used in the short is called LYCRA POWER™ which just so happens to come along with compressive qualities to it. We’re all aware of the supportive dynamic compression offered to our muscles; of which I certainly could feel. The material is not only compressive, but comes with a ribbed surface, allowing more airflow into the short (we all know how sweaty we tend to get under all that lycra). Bellwether innovated this fabric by means of trying to achieve the correct balance of breathability and moisture transfer.

Onto the chamois…I’ve certainly made a point to make the padding a topic of interest in my posts when discussing shorts. Let’s face it, what our unmentionables get squished against better be comfortable. Here’s why it’s different:  The overall design was made with elite-long distance riding in mind. The foaming in the chamois was placed strategically to be more dense along the contact points that hit the saddle in order to alleviate pressure and reduce road shock. We’ve all felt that surprise pothole 40 miles into the ride and could use the additional suspension in our shorts. I also found that while I was in aero position, I continued to feel padding in the pelvic bone region. Most cycling shorts are a giant boat pad in the back and that’s it, not taking into consideration that one might be pronating their hips forward. This was great.  I felt added relief in the front, important to a triathlete who might spend most of their time down on their aero bars.

Another feature to note is the soft elastic band that didn’t create imprints on my hips. Always a plus.  Although not a tri-specific short, the Forma’s are perfect for the long distance rides and well worth the buy. Available for purchase at One Tri.

Bellwether Forma Bike Short

It’s all about the short, the short, the short!  The bike short, that is.  Bellwether’s Forma Bike Short answers the call with a quality chamois, and durable fabrics that’s able with withstand the most aggressive rider on the road.

I’m careless when it comes in washing my athletic apparel, and I usually just throw these in the washer/dryer because I hardly have the time to hand wash this stuff.  After about 6 cycles now, the fabric and chamois has held up quite well!

The bonus is that the fabric, as is the case with all Bellwether mid to higher end shorts, is that they have a compressive property to it.  In theory, this could possibly be the best value for a compression cycling short!

Check out Greg’s take on the shorts below:

Features:

  • LYCRA POWER™ fabric supports muscles
  • Ribbed surface improves airflow
  • High-density 3D molded seat pad
  • Soft elasticized waistband
  • Externally sewn silicon leg gripper
  • Flat-locked seams
Fit: Ergonomic ten-panel design
Fabric:  Aenergia™, Axial™
Chamois:  Physio Pro™

See more Bellwether goods by checking out the Bellwether Products page.

Bellwether Aires Cycling Jersey

It’s all about the fit, the fit, the fit.  The Bellwether Aires Bike Jersey is currently one of my favorite cycling jerseys I have.

It features three slanted pockets on the back, and an extra zippered pocket in the center for the extra “can’t lose” valuables, like cash or cards for buying coffee or a sandwich post ride (a favorite activity of mine).

Features:

  • Multi-fabric with mesh inserts
  • Bottleneck collar and ergonomic sleeves
  • Elastic-free arm opening
  • Flat-seam construction
  • Silicon elastic gripper at the hem
  • Three slanted pockets and 4” zippered pocket

Fit:  Competition Fit
Fabric: X-Forma/X-Factor

Bellwether Comfort Control System

Clothing physiology is the interaction between the layers of clothing and the body’s own micro climate. Air temperature, humidity, skin temperature, rate of perspiration, and other factors all effect clothing performance. Technical fabrics and products only work well if they allow the body to achieve equilibrium between the input and output of heat and moisture.  With the Bellwether Comfort Control System, the correct balance of breathability and moisture transfer is achieved. The properties of each fabric are chosen to support the thermoregulation of the human body to insure maximum performance and optimal comfort.  At Bellwether we understand the functional design of our products. Using our Comfort Control System as a guide, we can ensure that each item is designed to excel for its intended purpose.

Xforma

The most advanced and technical fabric in our arsenal. X-Forma uses a lower denier (high filament) yarn on the outside to draw moisture through from the higher denier (low filament) yarn on the inside. In addition the inside yarn transports water through its capillary action. This dual combination multiplies the moisture management performance keeping you comfortable and dry.

Xfactor

The most technical mesh fabric we use has Mircopoly yarns which spread water droplets over a larger surface area to allow for quick evaporation, while open knit design maintains significant airflow also accelerating the drying process.

Interested in this jersey and other Bellwether products?  Check out the Bellwether product page for more bike apparel.

Profile Design T3+ Aero Bars

This is the Profile Design T3+ Aero Bar.  Profile Design’s T3+ Aerobar features multi-position drop-bend extensions for an aggressive position in Time Trial or Triathlon races.

6061-T6 aluminum extensions and forged brackets are light yet durable. Plus, the length, width, and rotation adjustment make it easy to dial-in the perfect position.

The T3+ also includes comfortable F-19 armrests (which are also length and rotationally adjustable) and the MULTI-FIT System, which accommodates both 26.0mm and 31.8mm bars. Additional J2 Brackets for offer an adjustable lower arm position.

The beauty of the T3+ Aero bar is that it angles upward so that your hands can stay in a neutral aero position.  This is particularly important especially if going to a flat aggressive position is much too drastic.

Gatorade G Series Pro

!! NOT THE SUPER MARKET GATORADE!! –  Look carefully, these are rare Gatorade G Series PRO products. They look like stuff in the big stores but they are not. These are different.

The special Gatorade G Series Pro formula is new and exclusive to niche specialty sporting goods stores such as OneTri.com.   Divided into three stages of nutrition fueling, each product is formulated to meet an athlete’s needs during training and recovery.

Pre Game Prime G1

Pre-Race/Pre-Event fuel with B vitamins to help convert carbohydrates to energy.

Usage Times:  Drink 15 minutes prior to the start of training or a race.

Nutritional Information (4-oz pouch)

  • Calories: 120
  • Electrolytes: Sodium 110mg, 30mg Potassium
  • Vitamins and minerals:
    • 20% DV Vitamin B3
    • 20% DV Vitamin B5
    • 20% DV Vitamin B6
  • Carbohydrate: 30g
  • Protein: 0g
  • Flavors: Lime, Berry

Perform Endurance G2

14 grams of carbs per serving to replenish spent energy during activity.

One canister makes 19-24oz servings or 57-8 oz. Servings. Each canister is 32 oz.

Gatorade Pro Recover G3

Post performance protein and carbohydrate rehydrating beverage formulated to stimulate glycogen replenishment and promote protein synthesis in muscle after exercise.

Usage Times: Drink within 30-60 minutes after training or competition

Nutrition Information (per 8oz serving)

  • Calories: 110
  • Electrolytes: 105mg Sodium and 40mg Potassium
  • Carbohydrate: 20g
  • Protein: 8g
  • Flavors: Mixed Berry, Orange

Louis Garneau Superleggera Aero Helmet

Ever golf?  The Louis Garneau Superleggera aero helmet has the properties of a golf ball to encourage better laminar flow.  This is the same technology that allows golf balls to fly straighter and farther.  Not even close to being a physicist – I studied philosophy in undergrad, I ended up reading up on the dimples in golf balls to get a basic understanding of how better airflow is encourage.  Interesting to learn something new.

Extremely light, this helmet weighs-in at a mere 12 ounces.  The helmet has a total of 5 vents. Up front are two vents that follow through to the rear three large vents for maximal airflow as an evacuation channel.  The Superleggera comes in two colors – Red/Black and White/Silver.

Interested in seeing more aero helmets?  You can find the Superleggera and more at our Aero Helmets page. For those of you new to aero helmets they are also known as triathlon helmets, aerodynamic helmets, or TT helmets (TT stands for time trial).

Giro Selector Aero Helmet

Having been long anticipated, the Giro Selector Aero Helmet made its made debut at time trials earlier this year. Specifically built for uncompromising time trial use, the Giro Selector features an eye shield and tail section, making it a unique aero helmet for the year. We’re sure this will quickly become a favorite triathlon helmet for triathletes.

I got a sneak peek a few weeks ago, and snapped some photographs.  Light and sturdy, these helmets are a departure from the Giro Advantage 2.  In particular, the helmet doesn’t have bendable flaps that goes over the ears.    Also notably different are the lack of front vents, adding to its aero attributes.  However, this may be of concern for those who race farther than an Olympic distance, as front vents become more desirable in longer distances or more specifically when heat is an issue.

Check out more on the Giro Selector, and other aero helmets to make the comparison for yourself.

Hydration Tablets – Nuun and GU Brew

Hydration tablets, such as Nuun and GU Brew Tablets, are the most convenient form of hydration in our nutrition for triathletes category.

Unknown to a lot of athletes and those new to the sport are  electrolyte solutions in a tablet form that dissolves once you drop it into water.  Containing none or nominal amounts of calories, these tablets taste great, and help keep you hydrated while you train or recover from training.

Do they work?  You betcha.  Taking one of these to prevent or to recover from a hangover after a night out is conclusive proof.  But enough about last weekend.

onetri nuun

Nuun

Calories: 8

Sodium: 360mg

Potassium: 100mg

GU Brew Tablet

Calories: 10

Sodium 320mg

Potassium: 55mg

Everyone in our office is crazy about them.  During training and on longer course triathlons, these are great because they’re in tube form, and you can easily carry them in a jersey pocket or a special needs bag if needed.  Looking at the numbers above, you can see that both products have the key ingredients of sodium and potassium as an electrolyte replacement.

Nuun has the edge on GU Brew Tablet in terms of nutritional raw numbers, but when deciding which one to stick with, it’s best to sample one of each to see how well you like the variety of flavors.  My favorite is the Nuun Kona Cola.

Profile Design Altair 52 Semi-Carbon Clincher

Intro

After wrapping up a few things at work, I went to the bike maintenance area to install the Altair 52 Semi Carbon Clinchers that were dropped by Profile Design for me and a few of the staff to demo.

I did a quick swap of the cassette and wheels in what seemed like record time, and was on my way home to the trail that funnels to Newport Beach.
A picture of the two aero wheel sets looking sexy in our studio.  Directly pictured is the Altair 80 Full Carbon Clincher
Insight

I squeezed in a ride about an hour 20 minutes, so I was able to get a good sense of what this deep dish wheel set could do when it comes to riding.  The feel of the wheels were undeniably carbon with an aluminum bead and braking surface, thus leading to its name, Semi-Carbon Clincher.  The weight of the wheels are listed at 1756 grams without the quick release.  A natural well-known wheel set in the same class is the Zipp 404.  In comparison for comparison’s sake, Zipp’s 404 clincher wheel set wins by about 100 grams at 1,658.  But in terms of value, function, and what you’ll get, I think Profile Design’s Altair is a no brainer.
Stiff and lightweight, I really liked how these aero wheels felt during my ride.  The winning points for the Altair 52 Carbon Clincher are its versatility and function, at its price point of only $1698.95.  With a 52mm section, it’s fast yet considerate enough of potential crosswinds that would affect a rider.  Included in the purchase of a Profile Design wheel set are 6 extra spokes, a spoke tool, skewers, valve extenders, and the backing of Profile Design’s industry leading customer service.
The Background on Profile Design Wheels
The story on Profile Design Wheels is that they’re a product of 2 years of research and development.  These deep dish wheels are unique to Profile Design, and are proprietary in nature.  They were designed using computational fluid dynamic software that calculates the interaction between the wheels and the elements (wind, air, fluid flows).  Instead of going with a wheel design and approach that benefits only the top 1% of athletes, Profiles Design factored in real world conditions, and more realistic competitive speeds in its production.  What this means is that you don’t have to be averaging 26+mph on a 40k TT course to reap the wheels’ benefit.
The Altairs are individually hand-built, and showcases some high-end features, such ahigh temperature resin, proprietary carbon lay-up, sealed cartridge bearings and bladed spokes with hidden nipples.

Conclusion

The Altair 52 Semi Carbon Clincher wheel set is excellent for all sorts of purposes – Tuesday night crit, triathlons, training, and TTs.  Its number one selling point is that it delivers performance, its craftsmanship is backed by its manufacturer, and in comparison to what is often in the market, it’s at a lower price point.  The wheel set is on my wish list!

Hydrotail Blaze Review 2

Intro

I’ve noticed there’s been a bit more interest in the Hydrotail Blaze, but not too much stuff on the web about it.  Here’s a post.

Pictured without cages
The Blaze is a new rear hydration system engineered by Beaker Concepts.  Its minimalist design is comparably less bulky than quite of few other hydration systems on the market today.  The system’s best feature are the snap locking design allowing you to adjust its angle after its initial installation with just an allen wrench. With many other systems, once installed, it’s in a fixed position, without much other room for additional configuration.  If you’re so inclined, you can make adjustments while on your ride.
Hydrotail Blaze with Profile Design Stryke Kages

Installation


A few nights ago after work, I finally got around to installing my own Blaze on my bike.  Without the detriment (or aid) of any alcoholic beverages, I managed to get the thing installed in about 40 minutes.  Installing the unit was quite intuitive, and the illustration on the instruction sheet was all I needed to figure it out.

Installing main piece onto the seat rails

I removed my seat so that I would have enough room to work the rails.  But before I was able to easily do this, I had to tape the nuts just so they wouldn’t fall off!

I thought I was pretty brilliant here
Securing the enclosure with the snap locking arms – making adjustments

Once I installed the first piece on the rails, everything else fell into place.  All I had to do next was pick the cages I wanted, and screw those on – cake.

The tri bike money shot
C02 cartridge and inflator secured in enclosure

Included is a “bullet” for a second C02 if you want.  The system also includes straps, so you can strap on tubes or tires.  During installation, I noticed the third set of screws on the side facing the bottom, allowing you to put on third cage.

The Test

I went out for a ride yesterday, and had no problems with the system.  I noticed it was a lot more quiet because I no longer have rattling issues like I did with my previous rear hydration system.  I didn’t have to adjust the angling, as it was pretty close, or even exactly, what I was used to from before.

Verdict

Very cool rear hydration solution.  I’d recommend it to anyone considering a rear hydration system.  The installation was pretty straight forward.  Its design is simple, and it works well with what I want and need.

You can find the Hydrotail Blaze, other Beaker Concepts products, and more at OneTri.com

Hydrotail Blaze

The importance of hydration, and how to functionally do it.

You’ve seen them at races. Mounted behind the seat of the rider, is a fancy hydration system that holds two cages for bottles, and maybe something extra like tubes and cartridges. It’s pretty cool looking, but how do you decide which one to get, and what will work best for you? This topic is a little more heated, as some camps hold the theory that rear hydration systems would slow you down because you’ll have to reach behind, while others simply despise the alternative – myself included when it comes to drink systems that rattle and attach to your aerobars.

I’d like to introduce something pretty awesome that is starting to hit the markets now. The Hydrotail Blaze.

Hydrotail Blaze - OneTri.com

Designed by the innovators at Beaker Concepts, the Blaze has got the edge on the original Hydrotail because it is completely adjustable when it comes to bottle angles and reach. This design solves the problem as presented by an uncomfortable reach behind your seat searching for your bottle. What I additionally like about the Blaze is that there’s an enclosure that allows for C02 and inflator storage, all integrated.

Features:

  • Integrated double CO2 cylinder holder
  • Infinite positions for bottles
  • Adapts to your natural reach
  • Easy set up
  • Double Velcro straps included (Does not include cages)

The Cervelo specific adapter for this product is available soon at OneTri.com. Nonetheless the product fits all standard seat rails. Cages, tubes, CO2, and other accessories are not included.